Tuesday, February 7, 2012

Topiary Girl

Hello! I wanted to tell you about this on-line painting class I'm taking & where it's taking me!!! 

In early January I signed up to take a class by Juliette Crane called How to Paint a Girl. It's not my first on-line class so I was not terribly nervous about how on-line classes work and whether they'd work for me. I was only a little bit nervous but really I was more excited to get over my fears: getting past muddy colors, sharing my art work with other people & painting faces!  It's been two weeks and already I'm making decent progress in these areas. Check out Juliett's sneak peek of How to Paint a Girl & an Owl!


~ ~ ~ ~ ~
Here's my painting
Topiary Girl
~ ~ ~ ~ ~

I dunno if you can you tell but I really like orange & green together!  Here is one of my 'girls' and I don't know about you but my favorite part of the girl is the skirt! I really love polka dots!

Honestly it took me a while - I worked on and off for days - to get this Topiary Girl accomplished.... but before I took this class I would have been discouraged when I got muddy effects from over painting. I would have either set it aside or worse yet thrown it out. Good thing Juliette talked some sense into me because I've learned how to avoid getting muddy effects. And if I do, and I did get them, I learned to walk away , let it dry, then apply a new color that I do like and continue on. Sometimes if I don't want to wait for the paint to dry on it's own I'll get the craft hair dryer out and speed things along.... my craft hair dryer is really just a travel sized hair dryer... ;-)

For my painting Topiary Girl  not only did I have to over come muddy colors but another more alarming obstacle for me was that I didn't know that I had selected a page with Crackle Glaze on it. I thought it was simply a sparse background of color. I think it was over a year ago that I put that page away. More than enough time to forget that it had Crackle Glaze on it. So, once I started painting everything got crackled needless to say I had to walk away.

I knew that the one thing I didn't want was a girl with cracked skin, or a crackled background. But, maybe I'll use that effect in the future but for now I had to work hard to fix it up. And yes it got muddy and a couple of times and when I went to blot at the paint it horrifically peeled off to the bare paper in some spots - this was unexpected and kinda ruined a few things I was liking. =(

I walked away though and let it dry. I knew I had to keep at it. I'm guessing that's how crackle acts when you water log it and poke at it too much? LOL! But eventually the crackle either came off or got buried under lots of layers of paint and I painted new things that I liked and forgot about the stuff I lost. The only place the crackle looked nice was on the skirt.

I think in two weeks I have come a long way, not just in dealing with my fears of painting faces and sharing my art with other people but in managing to make a difficult painting work by persevering and seeing it through to something that is successful and cute. =D

 ~ ~ ~ ~ ~
Here's what I used: acrylic paint, chalk, origami paper for the dress top, security envelope for the belt & an atom from scrap booking paper for the belt buckle & applied a gem with mod podge. A variety of brushes including: round, flat, sponge, and a stencil brush loaded with 6 different colors for the rounded effect on the topiary I think it really made the topiary's leaves look great!
 ~ ~ ~ ~ ~

I'll make her available at my Etsy shop soon but in the meantime you can let me know what you think!

Happy Days,
Stephie


Saturday, January 28, 2012

Quick Quiche

I thought I'd start my first blog post of 2012 with a recipe for comfort food. Last week I made up a home made chicken pot pie complete with a Crisco pie crust and had a bit of extra pie crust left over. There wasn't enough dough for a second pie so I wasn't sure what to do with it. In our home quiche is always a favorite but I'd never made a mini quiche before. I took a look at the dough and thought there was too much for one miniature quiche but I can make two... =) Here's my take on a mini Quick Quiche!


I pressed the dough into greased, miniature, spring-form pans.
Any greased, oven safe dish would work.
I fill it about half way with fresh broccoli floretes...

Next I added diced smoked ham.

In a separate dish I scrambled 4 eggs, a splash of milk, a dash 
of salt & pepper. Add any other seasonings you'd like!
I added half of the egg mixture to each pan 
filling it up to the pie crust edge.

I sliced one onion and sauteed it in olive oil until
it was a bit caramelized. Let it cool.
Then added half to each pan. I wanted the onions
to be decorative on top but they could also be diced and
added to the mix rather than pre-cooked.You can leave
out the onion all together and substitute it with sliced
tomatoes for a decorative top - just
brush with olive oil so they don't dry out too much.

Set oven to 425.... 
Don't they look fabulous!

30 minutes or so later.... 
The eggs poofed up and the top got nice and caramelized!

Ok, so it wasn't any really faster than making any other meal...
One thing that made it faster was having that pie crust already made up!
In all this took about 40 minutes to assemble & bake.
What kinds of sauces do you suggest eating with a quiche?

.
.
.

Here are just a few things I do to make meal time prep & clean up a bit faster & easier:
  • read a recipe all the way through & get organized 
  • reading through a recipe also helps me decide if I need to or want to make substitutions
  • gather / organize needed ingredients 
  • pre-heat the oven, grease pans
  • anything that needs dicing, sifting, mixing can be done & set aside while I do other food prep
  • if something needs to cool prepare it first so it's cool when I need it
  • when baking something that starts out watery I take the time to put it on a baking sheet. Odds are it will find a way to leak over the top or in the case of spring-form pans leak out of the bottom - I'd rather clean an extra pan than scrub inside my oven...
  • clean and put things away as I go
  • while I'm waiting for dinner to bake up I get the food prep dishes washed up

Have you noticed that not all recipes are organized for our convenience? What are some of your favorite comfort foods? Got any food prep / clean up tips that will make meals go smoother for you that you'd like to share? I'd be glad to hear them! Happy New Year! 2012 is gonna rock!


Stephie

Wednesday, September 14, 2011

cupcake pin giveaway when i reach 100 FB fans!

~ ~
~ ~ ~ ~
~ ~ ~ ~ ~ ~ ~
~ ~ ~ ~ ~ ~ ~ ~ ~
~ ~ ~ ~ ~ ~ ~ ~ ~ ~ ~
When I get 100 fans on my 
FB fan page I will host a 
a cupcake pin giveaway!
Visit my FB fan page 
and tell a friend!

Wednesday, August 31, 2011

fish n chips in newspaper

Today was a great day for a picnic! 


I simply made some fresh/frozen baked fish & sweet potato fries.

When they were done baking I wrapped them 
in parchment & newspaper, then set the picnic up outside! 
Having a tray to carry it all is very helpful!
The lemons made a nice table decoration.


 Set out some beer, fig vinegar & fresh squeezed lemon juice
and we had a lovely lunch on our front porch!

Just open the package and you can eat
right out of the wrap with your fingers or use utensils.

Do I even need to say it: easy clean up, too!
My kind of meal!

Thanks for visiting Blueberry Blonde!

~Stephie

Monday, April 18, 2011

SHOP ATTACK - round 40

I am starting a new weekly post theme for The Blueberry Blonde blog called "SHOP ATTACK" in collaboration with the Attack of the Craft forum. The aim is to feature a variety of artists from (AotC) Attack of the Craft share their Etsy shops, support their art and give them some exposure.

Did you know that the AotC forum is also called "The Island of Misfit Crafters". This forum brings people together in the spirit of sharing, promoting and celebrating DIY. Everyone is welcome! Whatever level you are at with your creative skills please feel welcome to join us! If aren't into creating and you are a patron of handmade you are also welcome join us and begin discovering all that AotC has to offer.

For more awesome handmade goodness, search the tag "attackofthecraft" on Etsy!
~ ~ ~ ~ ~
This weeks Shop Attacks has three stores for you to discover.
~ ~ ~ ~ ~


Johnston Graphics
Mike is a graphic designer and illustrator who is a fan of horror, sci-fi and B movies who seems to be infected by a rabid zombie virus ;)  I do like vampires and zombies but I'm liking the stylized look of this Darkling Drama greeting card.

Hana & Chou

What else can I say about Hana & Chou? Their stuff is super cute! Just check out this adorable pair of Happy White felt hair clips! *smitten*


Indiscretion  and Indiscretion's other shop
Indiscretion's first shop has this very cute hustler kissy tank!

Haute Indiscretion's other shop has this marvelous Empire Waist Princess Bride Wedding Dress *bliss*

Well that's all for now - Happy surfing!
xoxo,
Stephie

Sunday, April 17, 2011

SHOP ATTACK - round 39

I am starting a new weekly post theme for The Blueberry Blonde blog called "SHOP ATTACK" in collaboration with the Attack of the Craft forum. The aim is to feature a variety of artists from (AotC) Attack of the Craft share their Etsy shops, support their art and give them some exposure.

Did you know that the AotC forum is also called "The Island of Misfit Crafters". This forum brings people together in the spirit of sharing, promoting and celebrating DIY. Everyone is welcome! Whatever level you are at with your creative skills please feel welcome to join us! If aren't into creating and you are a patron of handmade you are also welcome join us and begin discovering all that AotC has to offer.

For more awesome handmade goodness, search the tag "attackofthecraft" on Etsy!
~ ~ ~ ~ ~
This weeks Shop Attacks has three stores for you to discover.
~ ~ ~ ~ ~


Killer Kitty is a mix of  horror, punk, and 80s fashion! She's got corsets, hoodies, bags, shrugs, dresses, skirts pants. She is based in California and loves making clothing with an edge. Just look at this awesome Danzig tank top!


Sock Punky has been an Etsy seller since 2010 and makes cute sock monkeys! Check out the Hot and fiesty punk rock sock monkey! How cute!


Eden Gallery  a married couple making and selling art on Etsy! She's a professional artists and teacher making neat abstract surrealist works and he is a self taught artist specializing in surrealism! Don't take my word for it look at this surrealist print -- the Philosopher. Then head over to their shop and see more!

Well that's all for now - Happy surfing!
xoxo,
Stephie


Tuesday, April 5, 2011

SHOP ATTACK - round 38

I am starting a new weekly post theme for The Blueberry Blonde blog called "SHOP ATTACK" in collaboration with the Attack of the Craft forum. The aim is to feature a variety of artists from (AotC) Attack of the Craft share their Etsy shops, support their art and give them some exposure.

Did you know that the AotC forum is also called "The Island of Misfit Crafters". This forum brings people together in the spirit of sharing, promoting and celebrating DIY. Everyone is welcome! Whatever level you are at with your creative skills please feel welcome to join us! If aren't into creating and you are a patron of handmade you are also welcome join us and begin discovering all that AotC has to offer.

For more awesome handmade goodness, search the tag "attackofthecraft" on Etsy!
~ ~ ~ ~ ~
This weeks Shop Attacks has three stores for you to discover.
~ ~ ~ ~ ~


Kalliope Kreations
If you're looking for one of a kind accessories for yourself or as a gift why not stop in and visit Kalliope! There's a lot of movie themed items and I'm such an EVIL DEAD fan that I couldn't resist sharing this Evil Dead bottle cap pendant with you!


aNGrYGiRLGear
It's hard to find custom clothing made to your size! Angry Girl Gear can make it happen and do it stylishly! Just give her a few weeks to construct the garment. OMG! Where does she find these gorgeous models!!! I'm having a hard time picking a favorite...  But this Madness Shrug has got to be the coolest!


Mellode
Cute and stylin' upcycled t-shirts over at Mellode's shop! My favorite is this Rainbow Zebra halter tee


Well that's all for now - Happy surfing!
xoxo,
Stephie

Tuesday, March 29, 2011

SHOP ATTACK - round 37

I am starting a new weekly post theme for The Blueberry Blonde blog called "SHOP ATTACK" in collaboration with the Attack of the Craft forum. The aim is to feature a variety of artists from (AotC) Attack of the Craft share their Etsy shops, support their art and give them some exposure.

Did you know that the AotC forum is also called "The Island of Misfit Crafters". This forum brings people together in the spirit of sharing, promoting and celebrating DIY. Everyone is welcome! Whatever level you are at with your creative skills please feel welcome to join us! If aren't into creating and you are a patron of handmade you are also welcome join us and begin discovering all that AotC has to offer.

For more awesome handmade goodness, search the tag "attackofthecraft" on Etsy!
~ ~ ~ ~ ~
This weeks Shop Attacks has three stores for you to discover.
~ ~ ~ ~ ~


Kute Girl Clothing
If you're a fan of upcycled t-shirts that include retro, cartoons, bands, movie themes you're gonna be happy you stopped in to see Cupcakeninja69's Etsy Shop! Just look at this fabulous Napoleon Dynamite shirt!  it's flippin' SWEET! (hee - hee)


Kiss Me Designs
At this Etsy shop you will find some fun hair accessories, dresses, aprons and other custom clothing. Here is one of my favorites are these cute pink plaid bows!


Carpe Noctem
Seize the night over to Carpe Noctem's lovely shop where you can dress to impress! There are so many cool hats and unique pieces of jewelery to choose from! My favorite is this Red Velvet eye patch!


I hope you enjoyed visiting the I Love Blueberry Blonde blog and exploring this weeks Shop Attack talent!
That's all for now! Happy Surfing!

xoxo,
Bluberry Blonde


Sunday, March 27, 2011

Torte that Cake!


Torte that Cake!

This post is not exactly a recipe for baking a cake but more about how to torte an already baked cake! Here are some notes from my experience. I will not be providing a recipe for the cake because you can torte any cake!
  1. I made two torted cakes so I needed to make a double batch of yellow cake from scratch
  2. I added a 1/4 teaspoon of yellow confectioners gel food dye for a more intense yellow color
  3. This made four 9" round cakes and 12 cupcakes 
  4. I filled my cupcakes with extra raspberry filling and topped w/frosting
  5. Remember to fill all pans just under 1/2 full so the cake won't rise too much over the top of the pans
  6. to fill pans I used a rubber spatula and plopped about 4 and half heaping spatula-fulls into the center of the pans, then I used it to spread from the center to the edges of the pan, if it looks like it is more than half full scoop some out because it will rise plenty -- trust in the rising power of baking powder! Less batter is better than too much!
  7. Use parchment paper in your pans so cakes don't stick and break
  8. cool cakes in pans at least 10 minutes before removing -- any sooner and you risk breaking the cakes
  9. after removing cakes from pans place onto cooling racks and cool completely before torting and frosting - cool in fridge or on a cool porch
  10. I used Madagascar Bourbon Pure Vanilla Bean Paste to improve flavor of the cake. I find it to be better than vanilla extract. You can also find it on Amazon.com
  11. I also doubled the butter cream frosting recipe, and used the same Madagascar Bourbon Pure Vanilla Bean Paste in place of the vanilla extract for continuity of flavor.
  12. The raspberry filling I used was a seedless Welches (squeeze bottle) jam --- I used two bottles
*****
You'll need
9" cake rounds
cupcake pans and liners
parchment paper
cooling rack
oven
timer
1, 2, 3 or 4 baked cakes
single or double batch of frosting
flavored filling
serrated bread knife
frosting spreader or butter knife
tall glass
pastry bag
coupler
round pastry tip (I used a Wilton 12)
small clip (I used a plastic chip clip)
lazy Susan or cake turner
prefab cake rounds 
(I cut some cardboard into 9" rounds by tracing my pans top side down - covered in tin foil.

*****
First: Bake and cool your cake(s) usually one or two cakes

Prep frosting 

Get your tall glass, pastry bag, coupler, round tip, tall glass and frosting spreader


Put coupler and tip onto bag, place bag into tall glass
Cuff the top edge of the bag over glass and fill bag using the pastry spreader 


When it is nearly full to the top
flip the cuffed edge up and add a bit more


Lift bag and slowly / gently push the frosting down toward the tip
Stopping just before it oozes out
Twist top of bag & add clip 


If you're traveling with the cake here's how to set up 
so you don't have to lift cake more than you need to

From bottom to top here's what I did:
Lazy Susan
travel carrier bottom
parchment - to lift cake out
foil covered cardboard for cake to sit on
cake
travel carrier lid 


Set the cover aside for now

If your cake did rise a bit over the 9" pan and the pan is flared
it will have a round bottom with a slightly wider top

You'll need to get the cake into a uniformly round shape before frosting
Put cake onto work surface upside down and use knife to trim away excess

*****
you can slide foil covered cardboard
under it so it's easier to lift
don't worry if it does break
just use that broken layer an inner layer of the cake
and not the top layer because the break may be visible
*****

Place trimmed round onto foiled cardboard 
that is set on the lazy Susan

Get the knife and hold it horizontal
starting at one side begin sawing into the cake
and using your other hand turn the lazy Susan
go ahead and torte all your cakes now


starting with one bottom layer
set aside all the rest of the layers

use the lazy Susan to turn cake as you work
get your pastry bag and make an outline in frosting 
then get the filling and make concentric circles
working your way towards the center


Here is what it looks like filled in
(sorry about the color being off this should be red because it is raspberry but looks like chocolate, LOL)
If you're making only 2 layers place the top on and skip this next step!

If you're making more than 2 layers:
continue to lay the torted halves on top and repeat pattern
of frosting the outer edge and making concentric circles of filling

until you have one torted cake layer left
this last layer should be the top and plainly frosted


***
I almost forgot to put some extra parchment under the
bottom edges of the cake, so I had to lift the edges
of the cake and tuck the parchment under about 1/2"
To do this just tear a few inches by a few inches
of parchment paper off and tuck around the perimeter of cake
***

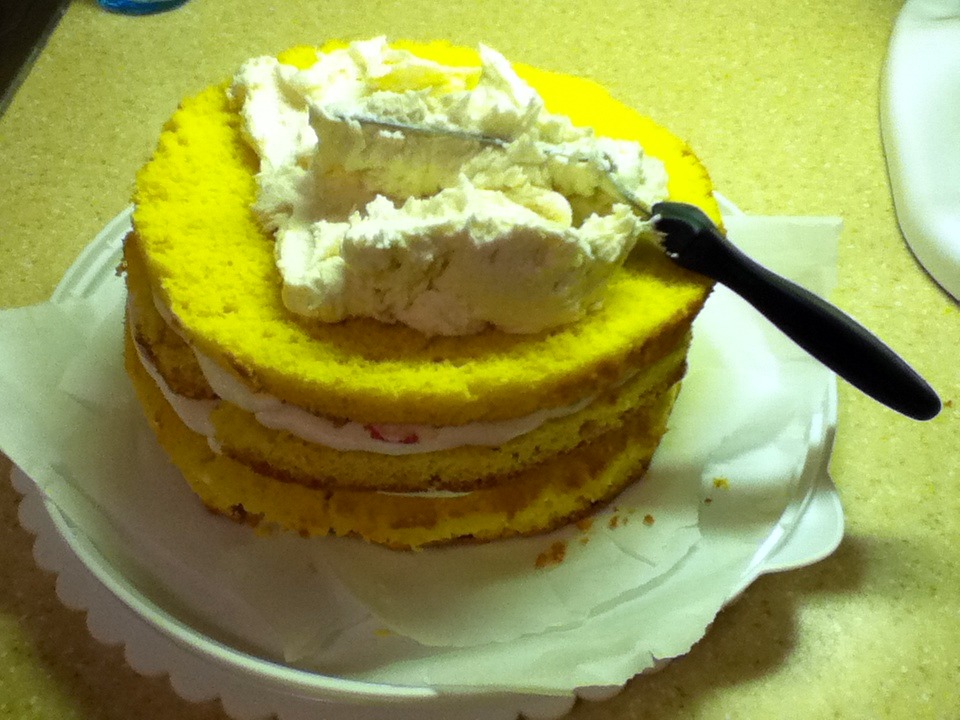
to frost the cake put a bunch of frosting on top and
gently spread from the center
to the edges pushing the excess
towards and then over the edge and
smooth it down the sides
using the frosting spatula
try not to press too hard
or the filling may ooze out of the torted layers


here's how it should look once it is frosted 
with parchment edging in place


once its frosted you'll carefully remove parchment edging


the reason for the edging is to collect excess frosting 
and keeping the foil base clean and pretty


take cake off lazy Susan and cover
cake and keep chilled until party time
*****


Here are a few more resources!


Thanks for stopping by I do hope this was helpful for you! Have a great weekend!
xoxo, Stephie