Sunday, April 29, 2012

Aurora Leaves the City Behind, a painting in stages

Painting on the brain...
I've been working on my painting skills over these past few weeks. I struggle though. The struggle is not just to find time to paint but to allow myself have the time and space to paint. Not sure what your take on painting is so I'll just speak to what it is for me, at this time. I like painting and I'd like painting to be one of my regular hobbies. I know that it isn't just a hobby but a skill that needs time, patience and lots of practice.

Express...
A painting can be an expression of an idea, a place real or imagined, a dream or be completely random and spontaneous. I usually creatively express myself in other ways like sewing or baking. Maybe it's because I prefer making something that I've had the most consistent successful results with. I should persist with painting because in time it too will begin to have successful outcomes...

Learning to relearn how to paint...
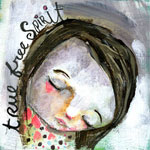
I've taken drawing, painting and watercolor classes years ago but I feel like I've forgotten much of what I once learned mostly because I didn't regularly paint. I only occasionally painted. So this year my New Years Resolution, a first for me, was to paint more. I don't make New Year's Resolutions so I thought if I do make one it will have to be a resolution I'd actually enjoy doing. A resolution that would bring back something I would like to welcome into my lifestyle; something that would enhance my life as an artist. In deciding to paint more I needed to find at least one on line painting class. And this painting (below) is from the first class I took this year by Juliette Crane called How to Paint a Girl.

Take a break...
One thing I'm beginning to understand is that I'm just like any other person who struggles with creating. There are times of success, times of frustration and sometimes downright failures. Some days I have a clear direction for what I'm creating. Other days I'm totally lost and muddling through. I'm learning to identify and accept these cycles as part of the process. It's difficult to KBO (Keep Buggering On) so when things don't work out I'm learning what works for me... taking a few minutes, hours or days away from a painting can be helpful. Working on more than one project at a time can be helpful. Get involved in something else like gardening can help to change my perspective. Taking the opportunity to get past a mental block can be a great way to help me work through these difficulties so I can get to that next level of creative freedom and expression. The more time I work on and work through these moments the more I will begin to have successful outcomes; just like I do with sewing and baking! Truth be told even though I do have a lot of experience baking and sewing there are still times they don't turn out no matter what... so yeah all part of the process!


Using an existing skill for a new purpose!
I love taking photos! One method I've begun implementing is to take photographs of my painting at different stages. Using photos in combination with painting is a new tool for me! I'm enjoying it because I can see how my painting evolves. I like seeing the progression from an idea to where I struggled and it's cool to see where I discovered elements that helped my piece become successful. It is kind of hard to see one idea get covered up by another but by taking photographs through the stages I can always look what I've lost and use the idea for another painting in the future so that's kind of cool. When a painting seems like it's not going anywhere or like I'm not having fun anymore taking a color I like and painting in a playful way helps. These photos are a great way to take a step back from the work. Seeing how the colors are balanced and work together, how the elements are balanced is important to see where the piece is going and what possibilities are waiting to be discovered! Photographing my paintings seems an especially helpful tool when I'm struggling.


Here's the first idea I had for this painting, a fairy girl in a garden... So I put a bunch of paint and ephemera on the canvas and started to carve out shapes but when I stepped back I wasn't liking the uneven wings, her hair or the ephemera after all... So I snapped a photo. Then I took a color that I do like and painted over all the stuff I didn't like. I kept at it and putting other colors on the canvas overlapping them and dripping paint all over and scuffling in some new shapes... 


As you can see a lot has happened between that first idea and this next photo. I applied many layers of color I turned the painting this way and that so I'd get interesting drips. I added trees and that big grey cloud. I added more detail to her face and dress. And with some time and energy and perseverance the whole thing was a lot more appealing. And although it is quite different than it began I really liked where it was going.


This is the finished painting! I really worked hard to get this girl to emerge. It was hard but I spent several days painting her, the path she's on, the trees, the shading, the cloud, the cityscape and the snow in order to get them to look as they do. And I believe the work I put in payed off! This is one of my more successful paintings and I couldn't be more pleased. It may not seem like much but from three simple photos it's easy to see where I started and how far the work has come. 


Change is good!
I ended up changing the initial theme but really this snow scene suits me better. I really love the blues and greens together. Her dress is such a cheerful green and the belt, which is really a bit of ribbon, is so sweet! To me there's something very magical about snow and shadows. The city and the cloud is a bit gloomy but it's behind her and with each step into the forest she's leaving the city behind. And what a coincidence! I moved from the city to the country! And I'm much happier for it. I know I can always go back to the city for a visit. Maybe someday I could even live in a city again but for now being in the country and seeing the stars and smelling the fresh air is so completely magical that it rejuvenates my soul everyday!

Thanks for stopping by. Please feel free to leave me questions, comments & feedback about my painting, Aurora Leaves the City Behind.

Enjoying the sunshine,
Stephie

Wednesday, April 11, 2012

CUPCAKE PIN GIVEAWAY CONTEST IS NOW CLOSED

Congratulations to the two winners Dorothy and Amber! Please email me at mrshannahs at gmail dot com with your address and I will send you your selection of cupcake pins. And how awesome is it that you're the  only two contestants?! Lucky you! I'll send each of you two pins! Please choose one more cute cupcake pin for me to send! 

~
~ ~
~ ~ ~ ~ ~ ~ 
~ ~ ~ ~ ~ ~ ~ ~ ~
Thanks to all 100 fans on my 
FB fan page I am now having an
awesome cupcake pin giveaway!
This contest is open to everyone!
There will be four cupcake pins
given away to four winners! Yay!


100 fans is a great milestone to celebrate and I'm doing just that with a giveaway! I've been smitten with these cupcake pins that I hand stitched, hand embroidered and decorated! They're so cute, wouldn't you agree? I get lots of compliments on my pink one that I wear on my jacket. I've been hoping to have this giveaway for my fans but I'm quite over joyed and have decided it's open to everyone! Yay! Of course you're all invited to follow my blog and my FB fanpage to keep up with me, my projects, get coupon codes and more! 

This contest will be open until Thursday April 19th (one week) and I will announce the four winners here on my blog soon after! 

It is simple to enter! One entry per person, please. Here's how: head over to my Etsy Shop then come back here and tell me in the comments below what your favorite Blueberry Blonde item is. I'd also like to know what your favorite thing about spring is! Also click on the cupcake pin photo below so you can see them better - they're all numbered - so you can let me know which cupcake pin is your favorite! 

Here's an example of a what valid contest entry includes:
From the Blueberry Blonde Etsy shop my favorite item is the Verdant Hectares bag. My favorite thing about spring is hearing all the song birds again! My favorite cupcake pin is number 15!


Best of luck to all who enter!
Stephie

Tuesday, April 3, 2012

Did you know?

Oh, hi! Thanks for stopping by! You may already know or have noticed that I'm not a daily blogger. Daily blogging isn't for everyone and that's ok. Balancing all there is in life with writing a daily blog isn't for everyone. It certainly isn't for me. That's why I set a personal goal of writing a monthly blog post or tutorial in an effort to have a fun blog to share things I'm interested in with family & friends while be realistic about what I actually have time for.

When I started this blog I knew I wanted to have tutorials somehow separate from my main blog so they could be easily found and searched. But being new to blogging and not being sure how to set it all up I ended up with two blogs. Ha-ha....

I get lots of visits to my main blog here... but not too many visitors to my my tutorial section but I would like to encourage you to have a look as there are some fun and interesting DIY tutorials! If you haven't seen them yet, then hopefully you'll have a chance to take a look. Here are three that I've written up thus far in 2012:


Enjoying the sunshine,
Stephie

PS: I'm just a few FB fans away from holding a cupcake pin giveaway! =)

Tuesday, February 28, 2012

A Very Twinkie blog post

One of my favorite fiber artists Twinkie Chan is having a great giveaway over at I Hate Michael Shirley check it out!
http://ihatemichaelshirley.com/post/18065587760/february-giveaway-twinkie-chan

Tuesday, February 14, 2012

Happy Valentines Day!

Valentine's Day is one of my favorite holidays! For me it is more than a day for me and my husband to indulge in romance, flowers, jewelry and sensual foods. I see it as great opportunity to tell my family & friends I love them too! Here's what I have planned: I've got a cute heart bunting that I made and put up next to pink tulips and paper whites and I'm planning on making a yummy steak and heart shape potatoes for dinner & I know Bill will love that! A can't forget a decadent dessert! I'm making heart shaped Boston cream cakes for us to enjoy together. Of course I'll  be wearing the new earrings my husband bought me! He also got me some cherry jam, cherry maple syrup and a jar of cherries when he was in Sturgeon Bay / Door County, WI yesterday. I do hope you have some wonderful plans for today too.
                                                                          
~ ~ ~ ~ ~
Nothing says I love you more than a hand made Valentine! And here's mine! It's painting of me & my Valentine! Titled 'Be My Valentine'


~ ~ ~ ~ ~
Made with acrylic paint, book pages, a variety of papers, liquid gold leafing, red flocking & Collage Pauge.\
~ ~ ~ ~ ~
UPDATE: I thought you'd like to see a couple of pics of some the yummy food we ate! =)

Baked Potato Hearts with Piedmont Steak & Salad


Happy Valentines Day,
Stephie

Tuesday, February 7, 2012

Topiary Girl

Hello! I wanted to tell you about this on-line painting class I'm taking & where it's taking me!!! 

In early January I signed up to take a class by Juliette Crane called How to Paint a Girl. It's not my first on-line class so I was not terribly nervous about how on-line classes work and whether they'd work for me. I was only a little bit nervous but really I was more excited to get over my fears: getting past muddy colors, sharing my art work with other people & painting faces!  It's been two weeks and already I'm making decent progress in these areas. Check out Juliett's sneak peek of How to Paint a Girl & an Owl!


~ ~ ~ ~ ~
Here's my painting
Topiary Girl
~ ~ ~ ~ ~

I dunno if you can you tell but I really like orange & green together!  Here is one of my 'girls' and I don't know about you but my favorite part of the girl is the skirt! I really love polka dots!

Honestly it took me a while - I worked on and off for days - to get this Topiary Girl accomplished.... but before I took this class I would have been discouraged when I got muddy effects from over painting. I would have either set it aside or worse yet thrown it out. Good thing Juliette talked some sense into me because I've learned how to avoid getting muddy effects. And if I do, and I did get them, I learned to walk away , let it dry, then apply a new color that I do like and continue on. Sometimes if I don't want to wait for the paint to dry on it's own I'll get the craft hair dryer out and speed things along.... my craft hair dryer is really just a travel sized hair dryer... ;-)

For my painting Topiary Girl  not only did I have to over come muddy colors but another more alarming obstacle for me was that I didn't know that I had selected a page with Crackle Glaze on it. I thought it was simply a sparse background of color. I think it was over a year ago that I put that page away. More than enough time to forget that it had Crackle Glaze on it. So, once I started painting everything got crackled needless to say I had to walk away.

I knew that the one thing I didn't want was a girl with cracked skin, or a crackled background. But, maybe I'll use that effect in the future but for now I had to work hard to fix it up. And yes it got muddy and a couple of times and when I went to blot at the paint it horrifically peeled off to the bare paper in some spots - this was unexpected and kinda ruined a few things I was liking. =(

I walked away though and let it dry. I knew I had to keep at it. I'm guessing that's how crackle acts when you water log it and poke at it too much? LOL! But eventually the crackle either came off or got buried under lots of layers of paint and I painted new things that I liked and forgot about the stuff I lost. The only place the crackle looked nice was on the skirt.

I think in two weeks I have come a long way, not just in dealing with my fears of painting faces and sharing my art with other people but in managing to make a difficult painting work by persevering and seeing it through to something that is successful and cute. =D

 ~ ~ ~ ~ ~
Here's what I used: acrylic paint, chalk, origami paper for the dress top, security envelope for the belt & an atom from scrap booking paper for the belt buckle & applied a gem with mod podge. A variety of brushes including: round, flat, sponge, and a stencil brush loaded with 6 different colors for the rounded effect on the topiary I think it really made the topiary's leaves look great!
 ~ ~ ~ ~ ~

I'll make her available at my Etsy shop soon but in the meantime you can let me know what you think!

Happy Days,
Stephie


Saturday, January 28, 2012

Quick Quiche

I thought I'd start my first blog post of 2012 with a recipe for comfort food. Last week I made up a home made chicken pot pie complete with a Crisco pie crust and had a bit of extra pie crust left over. There wasn't enough dough for a second pie so I wasn't sure what to do with it. In our home quiche is always a favorite but I'd never made a mini quiche before. I took a look at the dough and thought there was too much for one miniature quiche but I can make two... =) Here's my take on a mini Quick Quiche!


I pressed the dough into greased, miniature, spring-form pans.
Any greased, oven safe dish would work.
I fill it about half way with fresh broccoli floretes...

Next I added diced smoked ham.

In a separate dish I scrambled 4 eggs, a splash of milk, a dash 
of salt & pepper. Add any other seasonings you'd like!
I added half of the egg mixture to each pan 
filling it up to the pie crust edge.

I sliced one onion and sauteed it in olive oil until
it was a bit caramelized. Let it cool.
Then added half to each pan. I wanted the onions
to be decorative on top but they could also be diced and
added to the mix rather than pre-cooked.You can leave
out the onion all together and substitute it with sliced
tomatoes for a decorative top - just
brush with olive oil so they don't dry out too much.

Set oven to 425.... 
Don't they look fabulous!

30 minutes or so later.... 
The eggs poofed up and the top got nice and caramelized!

Ok, so it wasn't any really faster than making any other meal...
One thing that made it faster was having that pie crust already made up!
In all this took about 40 minutes to assemble & bake.
What kinds of sauces do you suggest eating with a quiche?

.
.
.

Here are just a few things I do to make meal time prep & clean up a bit faster & easier:
  • read a recipe all the way through & get organized 
  • reading through a recipe also helps me decide if I need to or want to make substitutions
  • gather / organize needed ingredients 
  • pre-heat the oven, grease pans
  • anything that needs dicing, sifting, mixing can be done & set aside while I do other food prep
  • if something needs to cool prepare it first so it's cool when I need it
  • when baking something that starts out watery I take the time to put it on a baking sheet. Odds are it will find a way to leak over the top or in the case of spring-form pans leak out of the bottom - I'd rather clean an extra pan than scrub inside my oven...
  • clean and put things away as I go
  • while I'm waiting for dinner to bake up I get the food prep dishes washed up

Have you noticed that not all recipes are organized for our convenience? What are some of your favorite comfort foods? Got any food prep / clean up tips that will make meals go smoother for you that you'd like to share? I'd be glad to hear them! Happy New Year! 2012 is gonna rock!


Stephie

Wednesday, September 14, 2011

cupcake pin giveaway when i reach 100 FB fans!

~ ~
~ ~ ~ ~
~ ~ ~ ~ ~ ~ ~
~ ~ ~ ~ ~ ~ ~ ~ ~
~ ~ ~ ~ ~ ~ ~ ~ ~ ~ ~
When I get 100 fans on my 
FB fan page I will host a 
a cupcake pin giveaway!
Visit my FB fan page 
and tell a friend!

Wednesday, August 31, 2011

fish n chips in newspaper

Today was a great day for a picnic! 


I simply made some fresh/frozen baked fish & sweet potato fries.

When they were done baking I wrapped them 
in parchment & newspaper, then set the picnic up outside! 
Having a tray to carry it all is very helpful!
The lemons made a nice table decoration.


 Set out some beer, fig vinegar & fresh squeezed lemon juice
and we had a lovely lunch on our front porch!

Just open the package and you can eat
right out of the wrap with your fingers or use utensils.

Do I even need to say it: easy clean up, too!
My kind of meal!

Thanks for visiting Blueberry Blonde!

~Stephie