

Torte that Cake!
This post is not exactly a recipe for baking a cake but more about how to torte an already baked cake! Here are some notes from my experience. I will not be providing a recipe for the cake because you can torte any cake!
- I made two torted cakes so I needed to make a double batch of yellow cake from scratch
- I added a 1/4 teaspoon of yellow confectioners gel food dye for a more intense yellow color
- This made four 9" round cakes and 12 cupcakes
- I filled my cupcakes with extra raspberry filling and topped w/frosting
- Remember to fill all pans just under 1/2 full so the cake won't rise too much over the top of the pans
- to fill pans I used a rubber spatula and plopped about 4 and half heaping spatula-fulls into the center of the pans, then I used it to spread from the center to the edges of the pan, if it looks like it is more than half full scoop some out because it will rise plenty -- trust in the rising power of baking powder! Less batter is better than too much!
- Use parchment paper in your pans so cakes don't stick and break
- cool cakes in pans at least 10 minutes before removing -- any sooner and you risk breaking the cakes
- after removing cakes from pans place onto cooling racks and cool completely before torting and frosting - cool in fridge or on a cool porch
- I used Madagascar Bourbon Pure Vanilla Bean Paste to improve flavor of the cake. I find it to be better than vanilla extract. You can also find it on Amazon.com
- I also doubled the butter cream frosting recipe, and used the same Madagascar Bourbon Pure Vanilla Bean Paste in place of the vanilla extract for continuity of flavor.
- The raspberry filling I used was a seedless Welches (squeeze bottle) jam --- I used two bottles
*****
You'll need
9" cake rounds
cupcake pans and liners
parchment paper
cooling rack
oven
timer
1, 2, 3 or 4 baked cakes
single or double batch of frosting
flavored filling
serrated bread knife
frosting spreader or butter knife
tall glass
pastry bag
coupler
round pastry tip (I used a Wilton 12)
small clip (I used a plastic chip clip)
lazy Susan or cake turner
prefab cake rounds
(I cut some cardboard into 9" rounds by tracing my pans top side down - covered in tin foil.
*****
First: Bake and cool your cake(s) usually one or two cakes
Prep frosting
Get your tall glass, pastry bag, coupler, round tip, tall glass and frosting spreader

Put coupler and tip onto bag, place bag into tall glass
Cuff the top edge of the bag over glass and fill bag using the pastry spreader

When it is nearly full to the top
flip the cuffed edge up and add a bit more
flip the cuffed edge up and add a bit more

Lift bag and slowly / gently push the frosting down toward the tip
Stopping just before it oozes out
Twist top of bag & add clip

If you're traveling with the cake here's how to set up
so you don't have to lift cake more than you need to
From bottom to top here's what I did:
Lazy Susan
travel carrier bottom
parchment - to lift cake out
foil covered cardboard for cake to sit on
cake
travel carrier lid

Set the cover aside for now
If your cake did rise a bit over the 9" pan and the pan is flared
it will have a round bottom with a slightly wider top
You'll need to get the cake into a uniformly round shape before frosting
Put cake onto work surface upside down and use knife to trim away excess

*****
you can slide foil covered cardboard
under it so it's easier to lift
under it so it's easier to lift
don't worry if it does break
just use that broken layer an inner layer of the cake
and not the top layer because the break may be visible
*****
just use that broken layer an inner layer of the cake
and not the top layer because the break may be visible
*****
Place trimmed round onto foiled cardboard
that is set on the lazy Susan
Get the knife and hold it horizontal
starting at one side begin sawing into the cake
and using your other hand turn the lazy Susan
go ahead and torte all your cakes now

starting with one bottom layer
set aside all the rest of the layers
use the lazy Susan to turn cake as you work
get your pastry bag and make an outline in frosting
then get the filling and make concentric circles
working your way towards the center

Here is what it looks like filled in
(sorry about the color being off this should be red because it is raspberry but looks like chocolate, LOL)

If you're making only 2 layers place the top on and skip this next step!
If you're making more than 2 layers:
continue to lay the torted halves on top and repeat pattern
of frosting the outer edge and making concentric circles of filling
until you have one torted cake layer left
this last layer should be the top and plainly frosted

this last layer should be the top and plainly frosted

***
I almost forgot to put some extra parchment under the
bottom edges of the cake, so I had to lift the edges
of the cake and tuck the parchment under about 1/2"
bottom edges of the cake, so I had to lift the edges
of the cake and tuck the parchment under about 1/2"
To do this just tear a few inches by a few inches
of parchment paper off and tuck around the perimeter of cake
of parchment paper off and tuck around the perimeter of cake
***
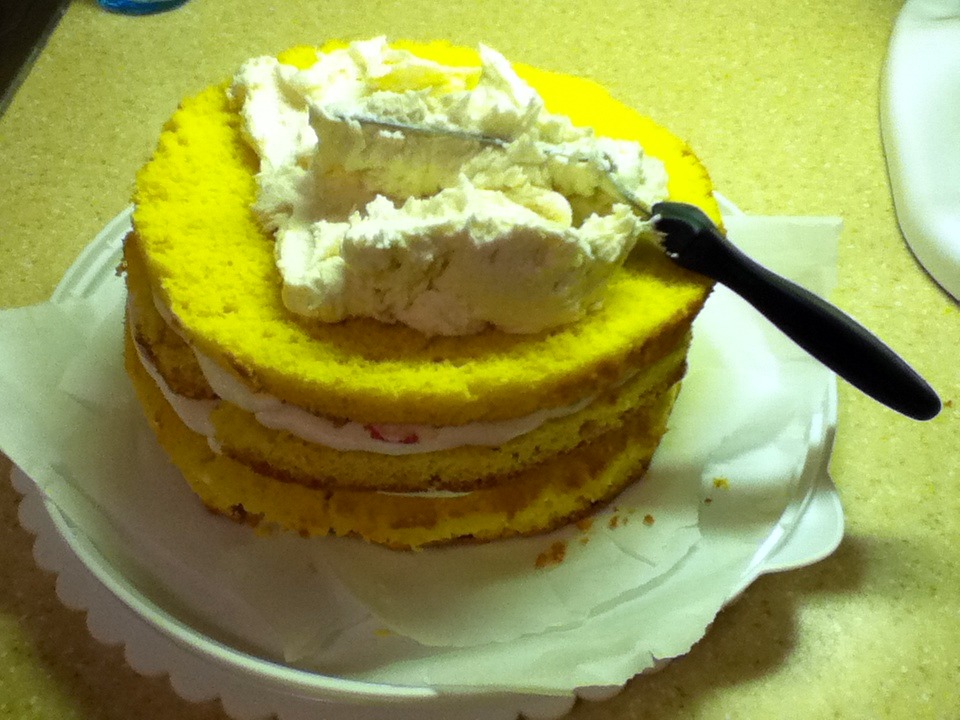
to frost the cake put a bunch of frosting on top and
gently spread from the center
to the edges pushing the excess
towards and then over the edge and
smooth it down the sides
using the frosting spatula
try not to press too hard
or the filling may ooze out of the torted layers
gently spread from the center
to the edges pushing the excess
towards and then over the edge and
smooth it down the sides
using the frosting spatula
try not to press too hard
or the filling may ooze out of the torted layers
here's how it should look once it is frosted
with parchment edging in place

once its frosted you'll carefully remove parchment edging
the reason for the edging is to collect excess frosting
and keeping the foil base clean and pretty

take cake off lazy Susan and cover
cake and keep chilled until party time
*****
Here are a few more resources!
Thanks for stopping by I do hope this was helpful for you! Have a great weekend!
xoxo, Stephie


.jpg)
.jpg)
That looks really great! : D
ReplyDeleteGreat tutorial! My stepmother used to do cakes and many times I'd help her by baking and even setting up the cake for her to decorate (because I couldn't do that part -- and still can't!).
ReplyDeleteI have heard the wonders of Madagascar vanilla and now must look for the the paste you suggest.